
Transformable Wheel
This project was built for ME3500J Design and Manufacturing (II) at SJTU as a term-long class project where each team designed and manufactured an autonomous vehicle to traverse a pre-defined track with multiple terrains—flat ground, a 60 mm step into a 120 mm-high sandbox (and back out via a slope), a pair of 90 mm height-restriction bars, a printed turning sign to recognize, and a final parking box. 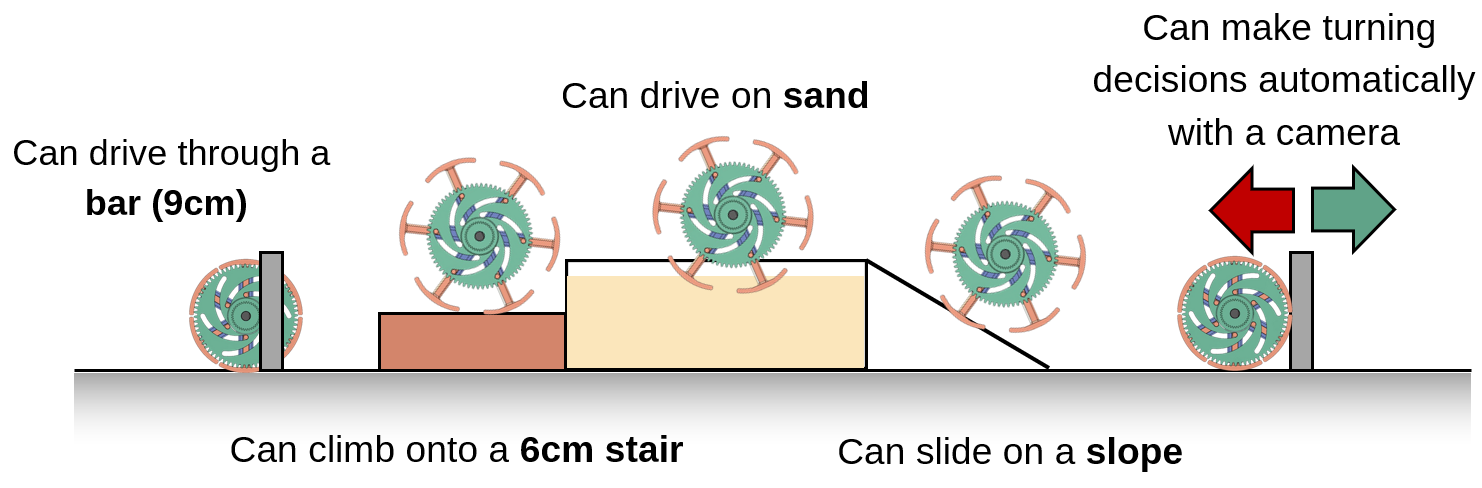
Design of Wheel Transformation Mechanism
The design of the transformable wheel is a reinvention of my previous patent, where we adopt the wheel expansion mechanism, but made some changes to eliminate the extra servo for it to better fit into a car. The major innovation in this project is a single-motor, dual-clutch transmission that drives both locomotion and transformation. Two electromagnetic clutches are used to release or lock the relative rotation of the wheel hub and the gear to enable wheel expansion and shrink. The picture below shows how the thing works. 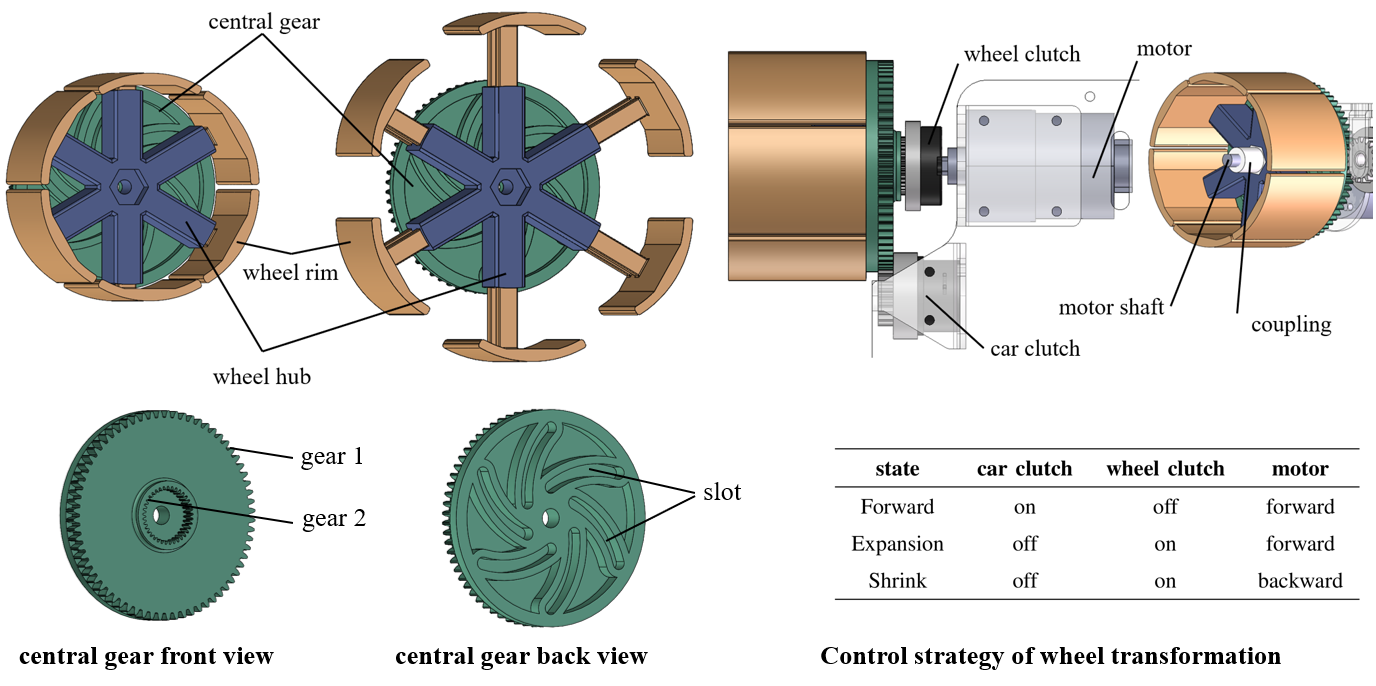
If you are still curious of how it works, the basic idea is that the output shaft of the motor is rigidly connected to the wheel hub by a hexagonal coupling, and is keyed to the inner ring of the wheel clutch. The outer ring of the wheel clutch is rigidly attached to the central gear through a meshing with gear 2. In addition, the inner ring of the car clutch is connected to vehicle through a key on the car clutch mount. The outer ring is rigidly connected to the central gear through a meshing with gear 1.
Electrical System and Control
Our setup is pretty simple: an IMU, a couple of ultrasonics, and a camera all feed into a Raspberry Pi. The Pi chews on that data—ultrasonics keep us from kissing walls, the camera reads turn signs—and decides where to go next. An H-bridge takes the Pi’s commands and drives two DC motors for smooth differential steering. A battery pack powers everything so we can roam untethered. 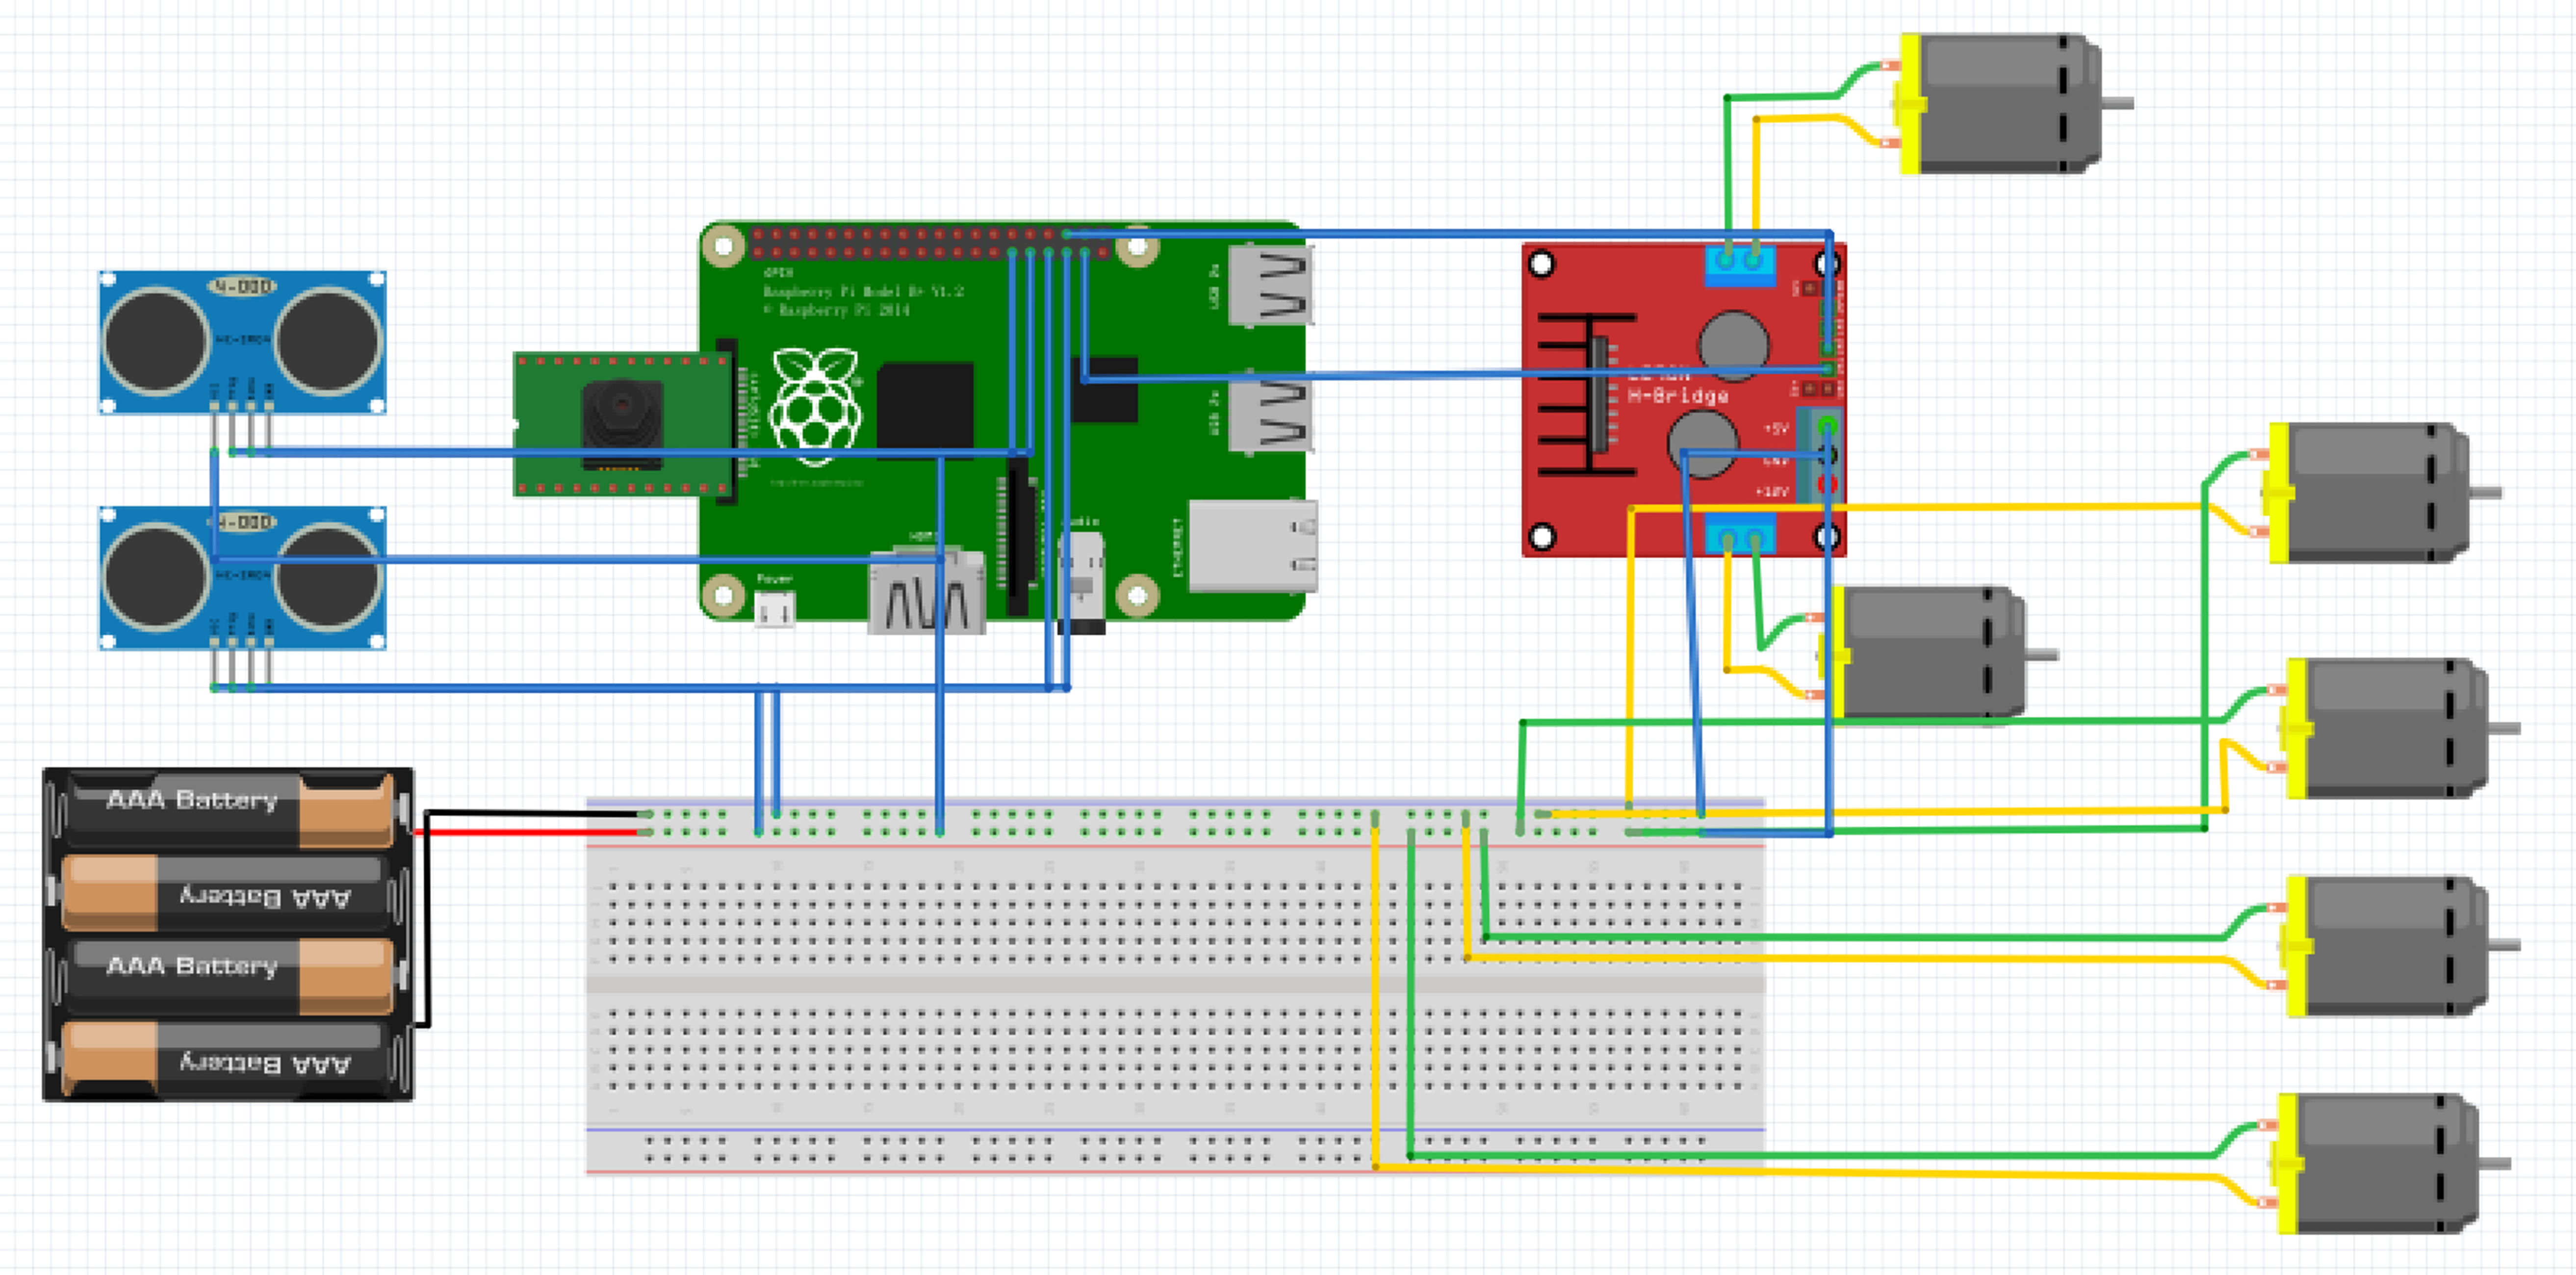
Since it’s not our first time to build a vehicle like this for a class project, we wanted to try something new. First, it’s our first time to use a Raspberry Pi as the microcontroller for the vehicle, and enabled vision-based decision making. Second, we tried an IMU based PID control to let the vehicle drive along a straight line. Although it’s clear to me that for a toy vehicle of this kind, adding a closed loop control for maintaining cruise may provide no visible benefits compared to just let two motors run freely, given only the low-end motors and sensors we could afford. Besides, it took us too much time to figure out how to get the PID controller works correctly such that we ignore some of the manufacturing challenges. However, this process is rewarding because it at least equip us with the potentials and skills needed build higher-end products later.
Manufacturing
Even if the design of the transformation mechanism seems very practical and smart, when it comes to manufacturing of such a thing, many unexpected scenario occurred. It turns out to be a real challenge to prepare all the parts we needed for putting the vehicle together. There are about ten separate parts for a single wheel, excluding the screws and nuts, that was supposed to be assembled correctly before the vehicle can actually drive on the ground.
Assembly took way longer than we expected. The trickiest part was getting 3D-printed parts to play nice with each other. You want “not too tight, not too loose”; the printer says “lol, no.” We printed, sanded, reprinted—repeat—until the rim’s guide rod finally slid smoothly in the hub slot. And the motor? That was a plot twist. Nothing off-the-shelf had both the torque we needed and a shaft that fit, so we have to transplant the head (gear box and shaft) of one motor onto the body of another. 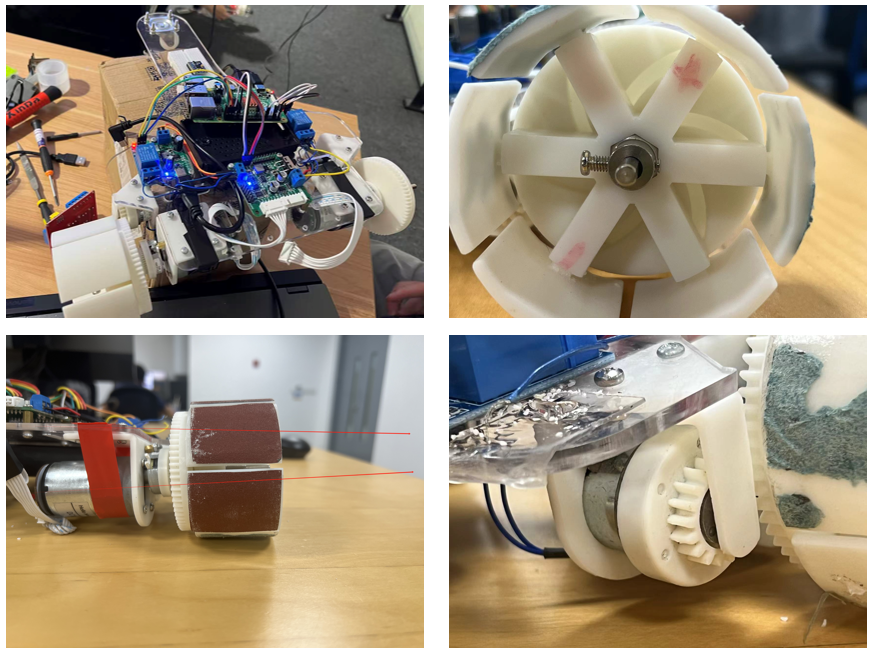
Some Thoughts
When doing this project, all of us seems to be in a hurry. Things we want to achieve seems much larger than we can actually handle within two months (together with other coursework). We were aggressive when planning the project, imagining all the engineering criteria we need to achieve as if we were developing a commercial product. But it turns out, the course itself doesn’t evaluate us that strict. After all, it’s only about driving a vehicle while adding some code for triggering wheel transformation. There are many shortcuts we actually can take but we didn’t. Silly from a “get the grade” angle, maybe—but from an engineer’s angle, it made sense. Doing a course project this way meant more late nights, more test–reprint–test loops, and a lot more time in the “why is this not fitting?” zone. But it also meant we learned the stuff you only learn the hard way: tolerances stack, motors lie on spec sheets, and your integration day will always find the one screw you forgot to buy.